Learn unique ways to drape a saree effortlessly and elegantly. Elevate your fashion game with these stylish draping ideas.
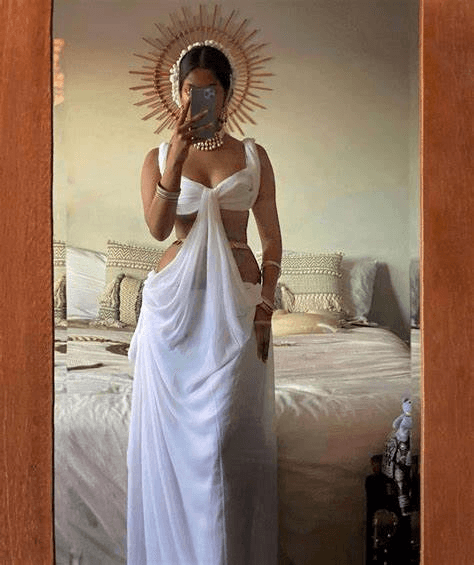
Natasha Thasan a great inspiration for saree draping
Hello dears! Do you know what? I’m a great fan of Natasha Thasan, a beautiful saree draper, fashionista, and Instagram influencer. I’m just amazed by her unique style of draping a saree in each reel, and I’m usually very fond of wearing sarees myself.
The minute I noticed the talk was about draping sarees in unique ways, I immediately decided to write about it in a blog. And that’s how my idea for this blog came up! So without any delay, let’s decode the most dazzling ways to drape sarees into a complete Western outfit and rock the show!

To drape a saree, all we need is a perfect plan for the outfit’s structure, style, secure pins, and a beautiful saree that suits the outfit you are creating.
Gown style draping

Elizabethan-Style Wedding Gown
For a unique and more regal look, I chose an Elizabethan-style wedding gown. Surprisingly, the draping style turned out perfectly for runways and Indo-Western style bridal outfits. Pastel neutral shades like cream, off-white, and gold are the best picks for this wedding gown. And what not—you are the show-stealer without any doubt!
Draping Technique
To drape an Elizabethan-style wedding gown from a saree, start by securing the saree into your petticoat at the center front to create a secure base. Bring the pallu around your back, ensuring it sits smoothly without any wrinkles, then pass it under your right arm and drape it across your chest, creating an elegant off-shoulder or sweetheart neckline.
Secure it at the shoulder with a pin. Bring the pallu back around your waist, creating a snug fit, and secure it with pins. Allow the remaining fabric of the pallu to flow freely at the back, creating a dramatic train. Adjust the fabric to create soft, cascading pleats, ensuring they are evenly spaced and adding volume and structure to the train.
Completing the Look
The combination of the off-shoulder neckline and flowing train gives this draping style a classic, elegant gown appearance, perfect for formal events. The snug bodice and voluminous train create a striking silhouette that is both regal and timeless, making you the show-stealer without any doubt.
Ruffled One-Piece Gown

The Ruffled Gown
This ruffled gown takes much more time to drape, but trust me, it is truly a game changer and gives a very unique look for your next event. The ruffled pleats occupy more space and look voluminous, so no matter how thick or thin you are, it will balance it all. The best fabric for this draped ruffled gown is georgette, and you should choose a bold color to make a unique statement.
Steps to Drape a Ruffled Gown from a Saree
1. Create the Bodice
To drape a ruffled gown from a saree, start by creating the bodice. Drape the pallu over your left shoulder, ensuring it forms an off-shoulder or sweetheart neckline. Secure the pallu with pins at the shoulder and chest for a snug fit.
2. Create the Ruffles
Next, create the ruffles using the remaining fabric. Fold small sections of the fabric and pin them in place, allowing the fabric to cascade naturally from the waist down. This will create cascading ruffles that add volume and drama.
3. Shape the Skirt
Shape the skirt by arranging the ruffles to form an additional layer over the base of the skirt, draping it elegantly to create a flowing silhouette.
Final Adjustments
Adjust the ruffles to ensure even spacing and volume, enhancing the overall look. The unique point of this draping style is the cascading ruffles, which add volume and drama, making this style stand out for its playful and romantic look. Remember to adjust the fabric as needed to ensure a smooth and elegant drape, and use a fabric like georgette for the best results.
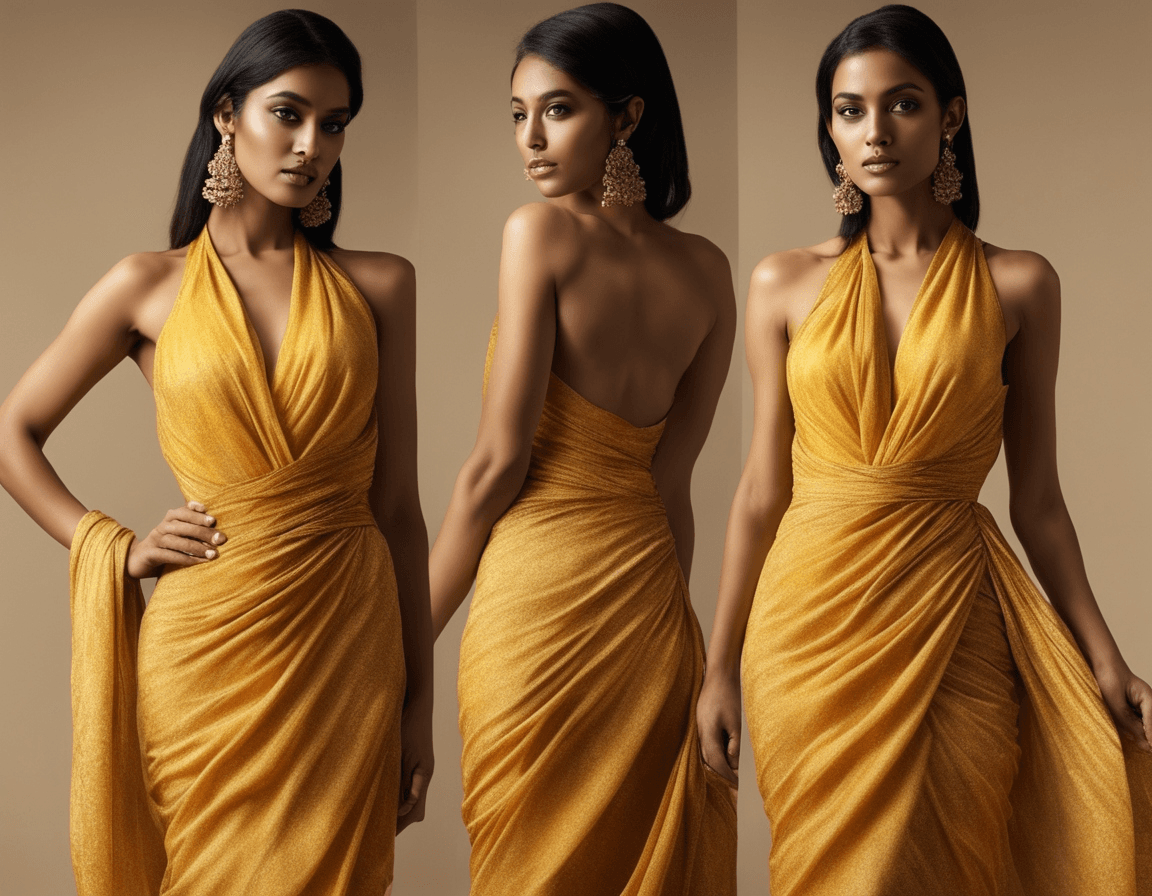
Grecian-Style Draping

Best Fabrics for Grecian Dresses
Grecian drape dresses are best known for their flowy silhouettes and flashy fabrics that immediately grab attention. They are perfect for red-carpet occasions, cocktail parties, or even church weddings.
When it comes to fabric selection, regular fabrics won’t do. Instead, these Grecian outfits are best made with shiny fabrics like chiffon, georgette, or silk. These fabrics offer a flowing and elegant drape.
Accessorizing the Grecian Dress
Pair sleek, matte-finish gold accessories like drop earrings and chokers with gold rope heels, and you’re all set for the party.
Steps to Create a Grecian Dress from a Saree
1. Secure the Saree
To create a Grecian dress from a saree with intricate details, start by securing the saree into your petticoat at the center front to create a secure base.
2. Drape the Pallu
Drape the pallu over your left shoulder in a toga-inspired style. Adjust the fabric to form an elegant off-shoulder or sweetheart neckline. Secure the pallu with pins at the shoulder and chest for a snug fit, ensuring it sits smoothly without any wrinkles.
3. Create Cascading Drapes
Use the remaining fabric to create cascading drapes by folding small sections and pinning them in place. Allow the fabric to flow naturally for a soft, flowing effect. Arrange the drapes to form an additional layer over the skirt, creating a flowing silhouette.
4. Adjust the Drapes
Adjust the drapes to ensure they fall gracefully, adding volume and movement to the outfit. The toga-inspired drapes and asymmetrical wrap give this style a distinct ancient Greek elegance.
Final Adjustments
The combination of the snug bodice and voluminous drapes creates a striking silhouette that is both regal and timeless, perfect for formal events. The soft, cascading drapes add a touch of drama and grace, making this style polished and elegant, with every detail contributing to the overall Grecian-inspired aesthetic.
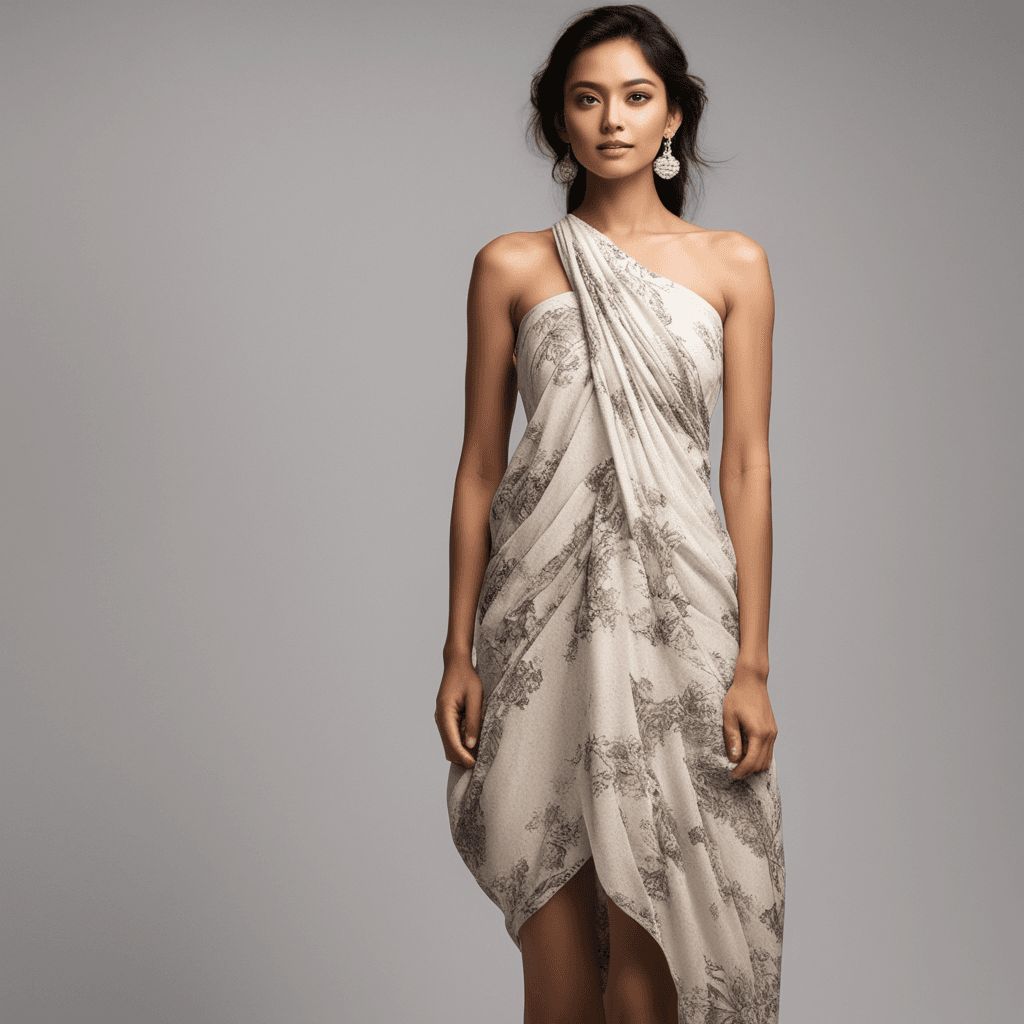
one shoulder draping

Most of us don’t know that this one-shoulder drape dress goes beautifully with temple jewelry and antique jewelry. To add more fusion, choose a saree with traditional prints like Kalamkari or Mandala. If you don’t like prints, keep it solid and elegant. For daytime occasions, keep the makeup muted and subtle. For night parties, you must wear bold makeup like shimmering eyeshadows and bold red lipstick.
Steps to Achieve the One-Shoulder Drape Dress Using a Saree
1. Secure the Saree
To achieve the perfect one-shoulder drape dress, start by securing the saree into your petticoat at the center front for stability.
2. Drape the Pallu
Bring the pallu over one shoulder, draping it diagonally across your chest. Secure it with pins at the shoulder and chest.
3. Flowing Fabric
Allow the remaining fabric to flow down your back, creating a smooth and even drape.
4. Create Small Pleats
Create small pleats at the waist for added structure. Secure them with pins to define your waist and enhance the tailored appearance.
5. Adjust for Comfort
Adjust the fabric around your shoulder for comfort. Use double-sided fashion tape if needed to keep the pallu in place.
Final Adjustments
Finish by smoothing out any wrinkles and making final adjustments to ensure a seamless and elegant look. The one-shoulder design offers a modern, stylish twist that is both chic and easy to wear. The neatly pleated pallu and flowing back fabric create a sophisticated silhouette perfect for any stylish event.

Choosing Colors for the Mermaid Dress
While choosing to drape a saree into a mermaid dress, there are some colors that go perfectly with this particular outfit. Coral pink, aquatic blue, mint green, and cream white are the best colors for a mermaid-style drape dress.
Selecting the Right Fabric
When it comes to fabric, you can obviously choose satin fabric for a flowy, airy feel for the outfit. This particular saree drape style is perfect for beach photography, outdoor weddings, and red-carpet events. Pair it with pearl or diamond accessories and muted, skin-finish makeup to blend the look.
Steps to Achieve the Mermaid-Style Drape Dress Using a Saree
1. Secure the Saree
To achieve the perfect mermaid-style drape dress, start by securing the saree into your petticoat at the center front for a stable base.
2. Drape the Pallu
Drape the pallu over one shoulder, ensuring the fabric is neatly pleated for a polished look, and let it cascade down your back. Secure the pallu with pins at the shoulder and chest to keep it in place.
3. Fit the Top
Ensure the saree is fitted at the top by wrapping it tightly around your waist and hips, smoothing out any wrinkles for a clean look.
4. Create Small Pleats
Create small pleats at the bottom to add volume and shape. Secure them with pins at the waist and hips to maintain the structure and enhance the mermaid effect.
5. Adjust the Fabric
Adjust the fabric around your waist and hips to ensure a snug fit. Consider using an underskirt or petticoat to add volume to the lower part of the dress.
6. Final Adjustments
Make final adjustments to the pleats and drape to ensure a seamless and elegant finish. The fitted top and flowing bottom create a mermaid-like silhouette, giving it a glamorous and fitted look perfect for any elegant event.
Sarong-Style Draping
Choosing the Right Fabric
When selecting the right fabric for a sarong-style drape dress, there are two best options: pure cotton and shiny silk sarees.
Pure Cotton
Pure cotton is perfect for casual outings, beach vacations, summer parties, and relaxed gatherings.
Shiny Silk
On the other hand, a sarong dress made from silk fabric can be styled for grand occasions. For a daytime look, keep accessories minimal and opt for flat sandals or espadrilles. As the evening approaches, switch to statement jewelry, such as bold earrings or a chunky necklace, and add a pair of stylish wedges or heels. A light shawl or scarf can also add a touch of elegance for a night-time look.
Choosing the Right Motifs
Choose a saree with traditional motifs or prints like block prints, ikat, or Madhubani art. These prints add a cultural touch to the sarong dress and make it unique. You can also accessorize with traditional jewelry to enhance the overall look.
Steps to Achieve the Sarong-Style Drape Dress Using a Saree
1. Secure the Saree
To achieve the perfect sarong-style drape dress using a pure cotton saree, start by securing the saree into your petticoat at the center front to create a stable base.
2. Drape the Pallu
Bring the pallu over one shoulder, ensuring the fabric is neatly folded for a polished look, and tuck it back at the waist. Secure it with pins at the shoulder and waist to keep it in place.
3. Create Small Pleats
Create small pleats at the waist before tucking the pallu to add structure and define your waist. Make sure the pleats are evenly spaced and symmetrical.
4. Adjust the Fabric
Allow the remaining fabric to flow freely down your back, creating a relaxed yet stylish appearance. Adjust the fabric to ensure a smooth and even drape, gently tugging on the fabric to remove any wrinkles and create a sleek, flowing line.
5. Secure with Pins
Use additional pins discreetly at the waist and lower back to maintain the shape of the dress. Once the drape is in place, step back and check for any uneven areas or loose fabric.
6. Make Final Adjustments
Smooth out any wrinkles and make final adjustments to ensure a seamless and elegant finish. If needed, use double-sided fashion tape to keep the pallu in position, especially if you plan to move around a lot during the event.
Finishing Touches
The sarong-style wrap offers a casual yet elegant look, perfect for beach or tropical settings. The combination of the neatly pleated pallu and flowing back fabric creates a sophisticated silhouette that is both relaxed and stylish. The added pleats at the waist provide structure and definition, enhancing the overall elegance of the outfit.
Empire Waist Draping

This empire waist gown is so versatile and can be worn for many grand occasions such as red carpet events, wedding bridal outfits, bridesmaid outfits, and cocktail parties. If you are a designer or suggesting to your designer, the saree fabric can look even more beautiful with beads, crystals, and pearl ensembles. To keep the empire waist gown wrinkle-free, choose a fabric like silk or satin that drapes well and is less prone to wrinkling. Use a handheld steamer to smooth out any wrinkles before wearing the gown.
Steps to Achieve the Empire Waist Gown Using a Saree
1. Wrap the Saree
To achieve the perfect empire waist gown using a saree, start by wrapping the saree just under the bust to create the empire waist. Ensure the fabric is neatly folded and secure it with pins at the bust and waist to keep it in place.
2. Create Small Pleats
For added structure, create small pleats at the waist before pinning the saree.
3. Drape the Pallu
Let the pallu flow down the front and back, ensuring the fabric drapes smoothly without any wrinkles. Adjust the pallu to create a high-waisted gown look, using additional pins if necessary to maintain the shape.
4. Symmetry and Evenness
For a polished appearance, ensure the pleats and drape are symmetrical and even. This high-waisted design elongates the silhouette, giving it a graceful and ethereal appearance.
5. Final Adjustments
The combination of the neatly pleated pallu and the flowing fabric creates an elegant and sophisticated gown that is perfect for grand occasions. Finish by making final adjustments to the drape, smoothing out any wrinkles, and ensuring the fabric flows seamlessly to create a cohesive and polished look.
peplum style draping

While other draping styles are suitable only for grand occasions and photo shoots, this peplum draping has the ability to look formal during a busy workday. It also works for dinner dates and night parties. Pair the peplum dress with elegant accessories such as statement earrings, a chic belt, and a matching clutch. Choose accessories in gold or silver to complement the saree’s color and fabric.
Steps to Achieve the Peplum Dress Using a Saree
1. Wrap the Saree
To achieve the perfect peplum dress using a saree, start by wrapping the saree around your waist, ensuring it sits just above your hips.
2. Create the Peplum Effect
Gather extra fabric at the waistline to create a peplum effect. Fold it into small, evenly spaced pleats and secure them with pins at the waist. This will add volume and structure.
3. Form the Fitted Bodice
Once the peplum effect is in place, wrap the saree snugly around your upper body to create a fitted bodice. Smooth out any wrinkles.
4. Cinch the Waist
Use a belt or waistband to cinch the waist further if desired. Secure the saree with pins at the bust and waist to maintain the structure.
5. Drape the Pallu
Drape the pallu over one shoulder, letting it flow smoothly down your back. Adjust the fabric to create an even and elegant drape. Use additional pins discreetly at the shoulder and lower back to keep the fabric in place.
6. Final Adjustments
Make final adjustments to ensure the pleats and drape are symmetrical and wrinkle-free. The combination of the fitted bodice and the flowing pallu creates a sophisticated silhouette. The peplum effect adds chic volume and structure at the waist for a fashionable look.
Finishing Touches
Finish by smoothing out any wrinkles and ensuring the fabric flows seamlessly to create a cohesive and polished appearance.
Tulip Draping style

So many of us might get confused about “where is that tulip shape in the tulip dress.” The tulip draping style differs in two ways: the bottom slit and top slit, both of which can look like a tulip bud. These tulip-style drape dresses are perfect for daytime events and occasions. To style this tulip-style drape gown, you should choose chiffon fabric to make the frills effortlessly flow, and add diamond or pearl jewelry to make it even more beautiful.
Achieving the Perfect Tulip Style Dress Using a Saree
1. Wrap the Saree
To achieve the perfect tulip style dress using a saree, start by wrapping the saree around your waist, ensuring it sits just above your hips.
2. Create Tulip-Shaped Pleats
Create tulip-shaped pleats at the front by folding the fabric into soft, rounded pleats and secure them with pins at the waist to add volume and structure.
3. Define the Waist
Use a belt or waistband to define the waist and create a smooth transition from the pleats to the bodice.
4. Drape the Pallu
Drape the pallu over one shoulder, allowing it to flow down the back, and adjust the fabric to create a smooth and even drape resembling a tulip skirt. Secure the pallu with pins at the shoulder and lower back to maintain its shape.
5. Create the Fitted Bodice
Wrap the remaining fabric snugly around your upper body to create a fitted bodice, smoothing out any wrinkles, and use additional pins to secure the saree at the bust and waist.
6. Final Adjustments
Make final adjustments to ensure the pleats and drape are symmetrical and wrinkle-free. The tulip pleats give the skirt a petal-like appearance, adding a feminine and elegant touch, while the combination of the fitted bodice and the flowing tulip skirt creates a sophisticated silhouette that is perfect for daytime events and occasions.
7. Finishing Touches
Finish by smoothing out any wrinkles and ensuring the fabric flows seamlessly to create a cohesive and polished appearance.
If you enjoyed this blog, be sure to check out our other posts for more fashion advice, style inspiration, and tips on looking your best. Happy styling, and see you in our next blog!
If you enjoyed this blog, be sure to check out our other posts for more fashion advice, style inspiration, and tips on looking your best. Happy styling, and see you in our next blog!
Don’t forget to check out all my other blogs! Fasholt – Trends, Tips, Timeless Style
Follow us on Instagram for daily fashion inspiration: https://www.instagram.com/fasholt_store
For inquiries, email us at contact@fasholt.com or you can DM us.